Save a designed group of shapes as a reusable template, then insert it and fill just a few variables like PLC and DB to bind the whole group's tags at once. The built-in input / keypad / table templates cover input fields, an on-screen numeric keypad, and dynamic tables; Template Edit edits an instance and Batch Replace bulk-replaces text and template variables.
A template = one PowerPoint group plus template metadata (template name, variable list, variable values). It adds a "variable" layer on top of native grouping: design a set of shapes, group them, save as a template, then insert from the library and fill only a few variables like PLC and DB. Every animation's tag address inside the group is then rewired to that device automatically. You keep PPT's native editing while removing the cost of copying one device template many times and hand-editing each tag address.
Three built-in templates ship with the product: input (an input field with three binding modes), keypad (a numeric keypad for an input field), and table (a dynamic table). The ribbon Templates group has three entries: Template Library, Template Edit (edit the selected template instance), and Batch Replace.
Save and insert: design a set of shapes in PPT and group them; with the group selected, open Template Library and click Save to store it locally. Later double-click or drag from the library to insert; the inserted group is marked as a template instance. The library also supports Import / Export (exchange templates between machines) and Delete.
Template Edit fields (vary by template kind):
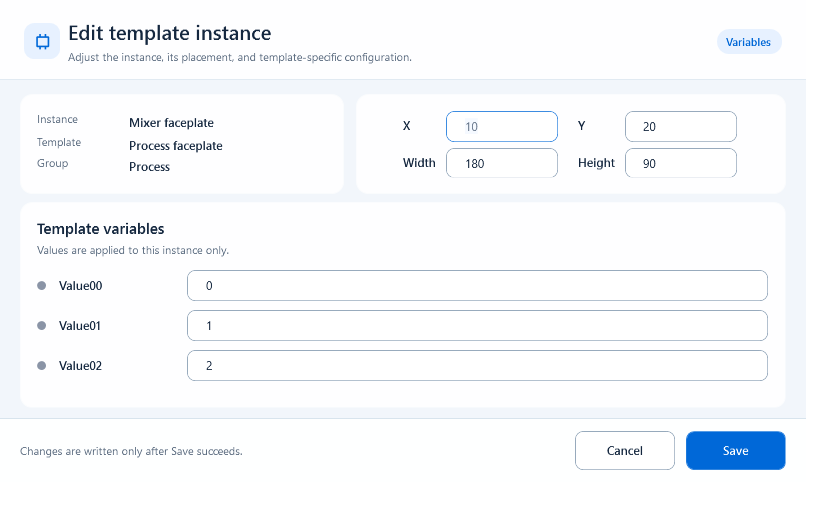
- All instances: Position and Size with X / Y / Width / Height (the top also shows read-only Instance / Template / Group)
- Plain template instance: a Template Variables section lists one input per detected <variable> (e.g. PLC, DB, RUN_TAG); filling it applies to the whole group
- input template: Input Mode (Plain Input keeps only the typed value and does not write / Runtime Variable binds a runtime variable / PLC Tag binds a PLC tag), Variable or PLC Tag (switches with the mode), Write Trigger (defaults to Immediate), Font Size
- keypad template: Target Input (pick the input template on this page to drive; digit keys append a character, Back deletes one, Clear empties, OK writes through the target input)
- table template: Table Name, Table Text ID, Headers, Header Text IDs, Rows (Rows accepts an array, a variable name, or a function name)
// Use template variables in expressions (segmented / whole)
ReadTagBoolean('<PLC>.<DB>.RUN', false)
ReadTagBoolean('<RUN_TAG>', false)
// Instance: PLC=PLC_LINE01, DB=DB_PUMP01 -> at runtime equals PLC_LINE01.DB_PUMP01.RUN
Select the template-instance root group and click Template Edit. Instance, Template, and Group are read-only identity checks. Fill X, Y, Width, and Height in Position and Size, then fill Template variables for this instance. Continue to its Input, Keyboard, Table, Alarm, or Chart section only after the common values are correct.
- Instance: confirm the selected instance name.
- Template: confirm the source template.
- Group: confirm its library category.
- X / Y: top-left position.
- Width / Height: overall instance size.
- Template variables: values for this instance only.
- If ValidationMessage appears, correct that field before Save.
Choose Input mode before entering a target. Plain Input stores local input only; Runtime Variable writes a page runtime variable; PLC Tag targets a device tag. Choose Immediate when confirmation should submit through the current binding, or External when another button or script will commit it. Finish with Font size.
- Plain Input: no variable or PLC tag target.
- Runtime Variable: enter the runtime variable name.
- PLC Tag: enter the full tag; template placeholders such as <PLC> are supported.
- Immediate: submit through the active binding after confirmation.
- External: hold the input for another action.
- Test display, submit, and cancel with a sample value after export.
The current page must already contain an Input template. Select the Keypad instance, open Template Edit, and set Target input to that input-instance name. Save and test digits, backspace, clear, confirm, and cancel. If the editor says no input templates were found, insert and save an Input template first.
- Configure Input before Keypad.
- Target input must exist on the current page.
- After renaming an input instance, recheck the Keypad target.
- For PLC Tag mode, test permission, confirmation, and write results.
Use Table name for a stable instance name and Table text ID when text mapping is required. Set Font size and column widths, then fill Headers, Header text IDs, and Rows. If any column width is set, all configured columns must total 100 percent; leave every width blank for equal columns.
- Table name: stable name for scripts and maintenance.
- Table text ID: overall text identifier when required.
- Column layout: percentages totaling 100 percent.
- Headers: visible header text.
- Header text IDs: language keys or text identifiers matching the headers.
- Rows: an array, page-script variable name, or function returning an array.
- Test zero, one, and multiple rows after saving.
Use the Alarm section to limit the alarm template's display range. Select the display options you need, then enter Tags, PLC codes, Function groups, Device groups, or Signal groups. Separate multiple values with commas or lines and use codes rather than display names.
- Tags: device-code.tag-code.
- PLC codes: device-code only.
- Function groups: device-code.group-code.
- Device groups: device-code.group-code.
- Signal groups: device-code.group-code.
- After export, use a known alarm in HQControl to verify the filter scope.
Four similarly named value mechanisms have different lifetimes. Choosing the wrong one leads to values that work on one page but disappear after navigation, or placeholders that remain unresolved at export.
- Template variables such as <PLC>, <DB>, and <RUN_TAG>: instance-level substitutions that must be resolved before export; they are not runtime page parameters.
- Plain Input: stores only the current input-template value and is read with template.getValue("input template instance name"); it does not cross pages automatically.
- Runtime Variable: belongs to the current runtime page and is intended for same-page linkage, not cross-page messaging.
- PLC Tag: belongs to the host data layer. Multiple pages may read the same Tag, but that is data binding rather than page-parameter passing.
- Page parameters: sent by Open Link, openPage, or Open Page as Popup and read on the destination with GetPageParameter*.
Two typical scenarios:
1) Many copies of the same device: design one pump/valve, save it as a template, and for each extra unit insert a copy from the library, open Template Edit, and fill that unit's PLC and DB. The whole group's animations point at that device's addresses with no per-tag editing.
2) An operator area with input and keypad: insert an input template set to Runtime Variable or PLC Tag, then insert a keypad template and choose this input in Target Input so operators key values in and write them out. To read the input value from scripts, use template.getValue("Input component name").
Batch Replace fits: quick renaming after copying a page, replacing content across grouped instances, unifying terminology, and replacing template-variable placeholders. After opening it the top shows Scope (Selected content / Current page) and Detected Variables (the <variables> it found); fill Find / Replace, and the grid below previews matching rows live with Type / Object / Replace In / Current Text / After Replace before you click Replace.
A few easy traps:
- Variable names must be wrapped in angle brackets. Letters, digits, underscore, and non-ASCII letters are supported, but hyphens, dots, and spaces cannot appear inside the name. Shared templates should prefer ASCII uppercase names such as <PLC> and <RUN_TAG>; write tag paths as <PLC>.<RUN_TAG>.
- Template variables are instance-level and live only on the instance root group: copying the whole group carries them along and all child shapes share one set of values; don't try to set them per child shape
- Variables may be left blank while editing/inserting, but export validates them: if any unreplaced <variable> remains, export fails, so fill them all before exporting
- Template Edit only works on a template instance root group: with a plain shape or plain group selected the button is unavailable; picking the wrong object means the editor won't open or shows no variable rows
- keypad needs an input template first: if this page has no input template yet, Target Input prompts you to insert one and come back
- Batch Replace is for text/placeholders, not structural changes: if every replace still needs heavy manual layout fixes, fix the template source instead of repeatedly batch-replacing