Move is one of the Geometry behaviors, alongside Rotate and Scale, all of which change the component's own geometry. Its job is simple: take one numeric input and map it proportionally into an offset along a single axis (horizontal or vertical), shifting the component relative to its original position on the page. It fits "one value drives a linear slide" animations such as tank-level rise/fall, slider travel, and horizontal indicator bars. If you instead want "rotate by an angle" or "grow/shrink from one edge", use Rotate or Scale, not Move.
Geometry
Geometry: Move
Maps one numeric input into a proportional single-axis (horizontal or vertical) offset, shifting the component from its original position. Common for tank level, slider, and horizontal indicator motion.
What it is and what it is for
Move is one of the Geometry behaviors, alongside Rotate and Scale, all of which change the component's own geometry. Its job is simple: take one numeric input and map it proportionally into an offset along a single axis (horizontal or vertical), shifting the component relative to its original position on the page. It fits "one value drives a linear slide" animations such as tank-level rise/fall, slider travel, and horizontal indicator bars. If you instead want "rotate by an angle" or "grow/shrink from one edge", use Rotate or Scale, not Move.
How to use it: every control in the editor
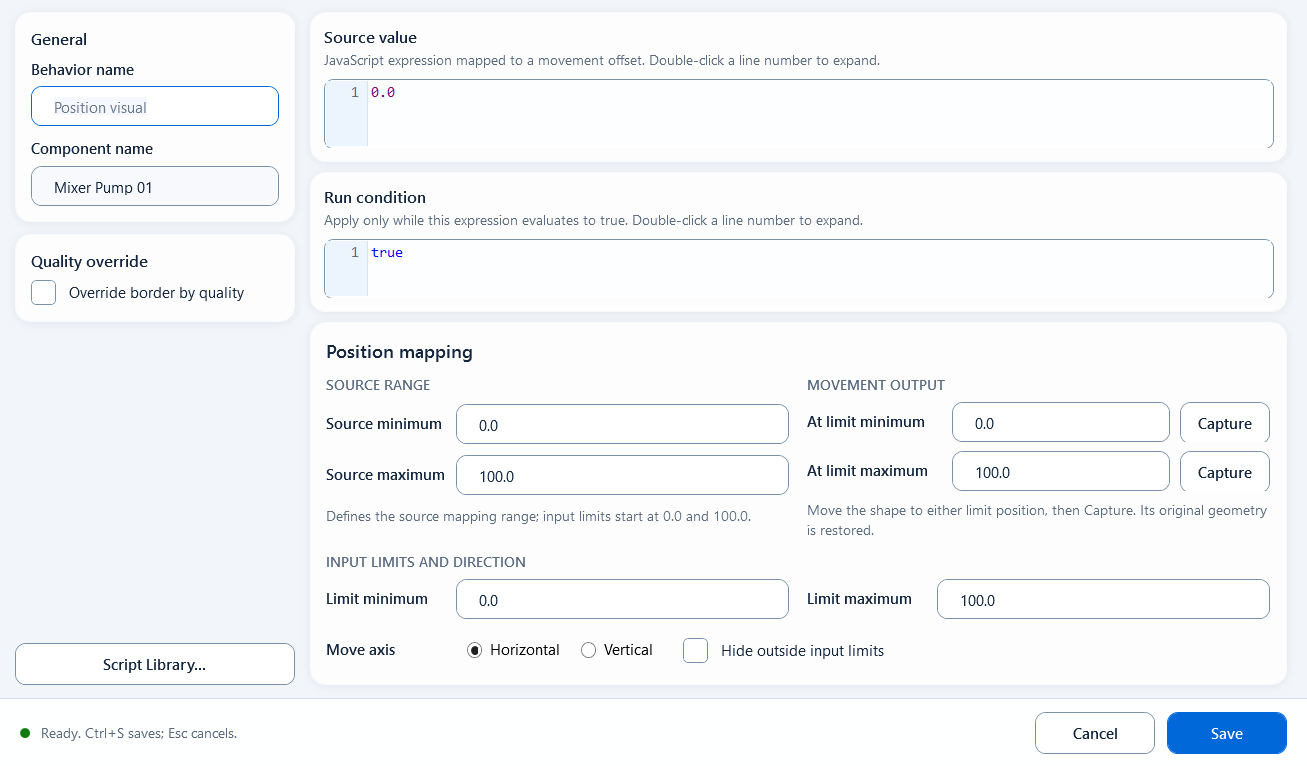
Double-click the Move behavior under the component to open the editor. The left side holds shared controls, the right side is Geometry Setup, and the bottom row handles validation and saving. Move maps Source Value from its Source Min / Source Max position into the Move Min / Move Max offset range. Move Min / Move Max are real canvas distances, not percentages.
General / Behavior Name: the display name shown in the behavior tree; it does not change the bound component.
General / Component Name: the current component name, read-only. If it is not the shape you meant, close the editor and reopen it from the right component.
Quality Override / Quality Border: enables the GOOD / BAD color swatches. GOOD defaults to #000000, BAD defaults to #FF8800; click a swatch to choose a #RRGGBB color.
Script functions button: opens the snippet picker and inserts the selected snippet into the focused expression box; with no focused field it defaults to Source Value.
Source Value: the expression that drives movement, default 0.0. Device.TAGNAME in the editor is a format cue; replace it with an actual project tag before saving, for example ReadTagDouble("PLC_LINE01.PUMP01.POSITION", 0). Usually this reads a tag or returns a calculated number.
Condition: the run condition expression, default true, with the cue true or running === 1; false skips this Move update.
Source Min / Source Max: the input source range, default 0.0 / 100.0; together they define the 0%-to-100% mapping position.
Move Min / Move Max: output offsets, default 0.0 / 100.0. Use a number, a negative number, or an expression such as shape.width; the Target buttons beside them can write offsets from the current PowerPoint shape position.
Limit Min / Limit Max: input clamp range, default ValueMin / ValueMax; use an alias, fixed number, or expression to bound the input used for mapping.
Move Axis: Horizontal uses the Left delta, Vertical uses the Top delta; choose the axis before using Target.
Hide outside range: hides the component when the input exceeds the limit range; leave it off if you only want clamping.
Bottom status / OK / Cancel: the status area shows live validation; OK validates again and saves, while Cancel or closing the window discards the edit.
// Source Value
ReadTagDouble("Tank.Level", 0)

// source range and offset range
Source Min = 0,  Source Max = 100
Move Min   = 0,  Move Max   = -shape.height   // at full scale, move up one self height
Move Axis  = Vertical
How the Target buttons work
The Target buttons beside Move Min / Move Max are not decorative. When the editor opens, it snapshots the component's original position. After you drag that same component in PowerPoint to the desired extreme position, click Target; the editor writes the current-position-minus-original-position offset into the field, then restores the component to its original geometry.
Choose Move Axis first: Horizontal writes current Left - original Left; Vertical writes current Top - original Top.
For the lower extreme, drag the shape there and click Target beside Move Min. For the upper extreme, drag it there and click Target beside Move Max.
The written value is formatted as 0.### and is ready to use as Move Min / Move Max; you can still overwrite it with an expression.
Target requires the same component to still be selected. If the wrong shape is selected, or the original/current geometry cannot be read, it warns instead of writing a guessed value.
After saving the offset, Target tries to restore the shape to the position it had when the editor opened. If restore fails, the offset is still saved and the editor warns you to put the shape back manually.
When to use it
Use Move when a measured value needs to directly drive a straight-line slide. Two common scenarios:
Tank level: map the level percentage into a vertical offset so the liquid block floats up and down with the level
Slider / horizontal indicator: map a 0-100 value into a horizontal offset to produce slider or horizontal indicator bar motion
Boundaries and common mistakes
A few easy traps:
Move Min / Move Max are real distances, not percentages - to "move right by one body width" set Move Max = shape.width, not 100 (which is treated as 100 canvas units)
Simplest setup for beginners: set Source Min = Limit Min and Source Max = Limit Max so the input range is not adjusted twice
Choose Horizontal / Vertical before clicking Target; the wrong axis writes the offset from the other direction
Target restores the shape to the position it had when the editor opened. If you actually want to permanently move the shape, close the editor, move the shape, then reopen the behavior editor.
Figure 1: Move editor
Set the source range, offset range, and axis to map a value proportionally into a single-axis offset.