Build a reusable template from scratch, name placeholders correctly, fill instance values, work with Input values and page parameters, and configure alarm templates without mixing value lifetimes.
Choose the value mechanism before authoring
Parameter passing is not one universal feature. First decide when a value is known and where it must be used. Use template variables for device addresses that change per inserted instance; Input values or Runtime Variables for temporary operator state; and page parameters only when opening another page or popup with context.
- Template instance variable: filled after insertion, such as <PLC> or <RUN_TAG>.
- Input template value: entered at runtime and read with template.getValue("instance name").
- Runtime Variable: temporary state shared inside the current runtime page.
- Page or popup parameter: sent while opening the destination and read with GetPageParameter*.
- PLC Tag: device data binding. Shared access from several pages is not page-parameter passing.
1. Build a parameterized template from scratch
Create the device artwork, text, behaviors, and interactions in PowerPoint, then group the objects that must be reused together. Replace only the per-instance parts with angle-bracket placeholders. Placeholders can appear in visible text, tag fields, and JavaScript string literals. In scripts, keep them inside string literals so replacement is reliable.
- Visible text: Device <DEVICE_NO>.
- Tag path: <PLC>.<RUN_TAG>.
- Script string: ReadTagBoolean("<PLC>.<RUN_TAG>", false).
- Bit reference: <STATUS_TAG>[3]; keep the bit index outside the placeholder.
- Parameterize only values that genuinely vary by instance.
var running = ReadTagBoolean("<PLC>.<RUN_TAG>", false);
var alarming = GetAlarmTags([
  "<PLC>.<ALARM_TAG>"
]);

return running && !alarming;
2. Name placeholders and compose tag paths
Wrap each variable in one pair of angle brackets. Short ASCII uppercase names such as <PLC>, <DEVICE_NO>, and <RUN_TAG> are recommended for shared project templates. The current version also recognizes non-ASCII letters, but dots, hyphens, and spaces cannot be part of a variable name. Compose a tag path from variables and fixed separators.
- Recommended: <PLC>, <DB_01>, and <设备编号> are valid.
- Correct path: <PLC>.<RUN_TAG>; incorrect: <PLC.RUN_TAG>.
- Correct bit reference: <STATUS_TAG>[3]; incorrect: <STATUS_TAG[3]>.
- Do not use <RUN-TAG> or <RUN TAG>.
- Case differences create different fields; keep one spelling for one meaning.
// Instance: PLC=LINE01, RUN_TAG=PUMP01.RUN
ReadTagBoolean("<PLC>.<RUN_TAG>", false)
// Exported target: LINE01.PUMP01.RUN
3. Save and review Captured variables
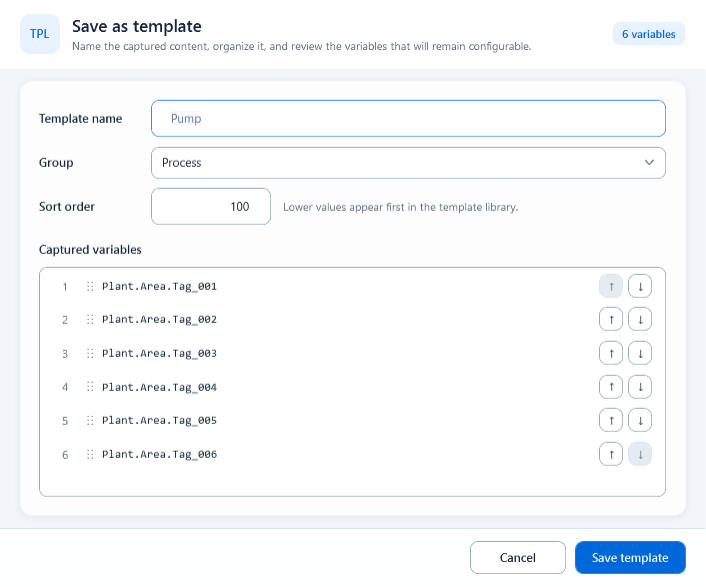
Select the reusable group and click Save in Templates. Fill Template name, Group, and Sort order, then review Captured variables. A missing variable usually means the source uses an invalid form; duplicated variables with different case should be normalized in the source. The order here becomes the field order in Template Edit.
- Template name: identify the device or purpose, for example Pump faceplate.
- Group: organize by process, equipment, or project.
- Sort order: lower values appear earlier in the library.
- Captured variables: verify every name, count, and order.
- After saving, insert a fresh instance from the library and test it.
4. Insert an instance and fill its variables
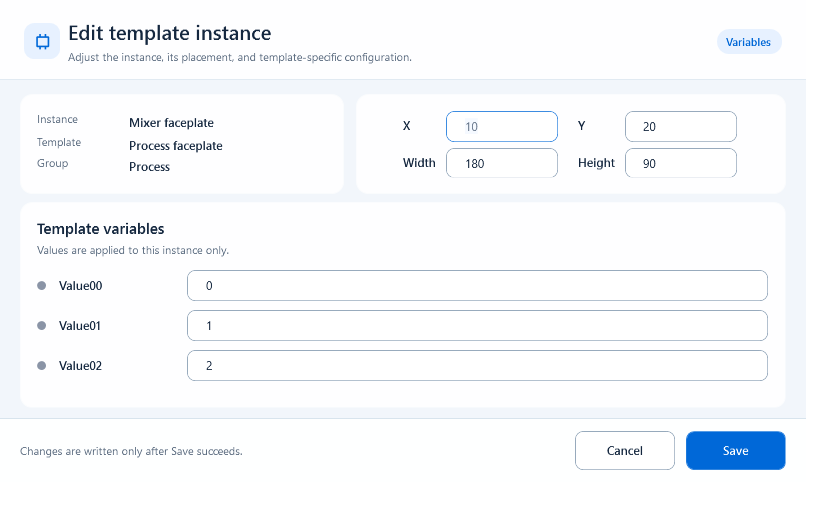
Double-click or drag a template from the library, select the template-instance root group, and click Template Edit. Confirm Instance, Template, and Group; review X, Y, Width, and Height; then fill Template variables. These values apply only to this instance and travel with it when the whole instance is copied.
- Select the instance root, not a child shape inside it.
- Enter replacement values without angle brackets, for example LINE01 for PLC.
- The same placeholder in text, behavior tags, and script strings receives one instance value.
- A blank can be saved during editing, but tag placeholders must be resolved before final export.
- Reopen Template Edit and confirm values, position, and size after saving.
PLC       = LINE01
RUN_TAG   = PUMP01.RUN
ALARM_TAG = PUMP01.ALARM
// <PLC>.<RUN_TAG> -> LINE01.PUMP01.RUN
5. Input values and cross-page parameters
Input templates collect runtime values and should not be replaced by authoring-time placeholders. Read a Plain Input with template.getValue("input instance name"). Use Runtime Variable for same-page state. When opening another page or popup, send explicit context such as device code or mode and read it on the destination with GetPageParameterString, Integer, Double, or Boolean.
- Plain Input: the value stays on that Input instance until a script reads it.
- Runtime Variable: temporary same-page linkage; do not treat it as durable cross-page state.
- PLC Tag mode: confirmation submits according to host permission and write rules.
- Page parameters: a contract between the opening page and the destination.
- For complete open-and-receive examples, continue to Script scope and parameter passing.
var setpoint = template.getValue("Speed input");

var deviceCode = GetPageParameterString("deviceCode", "");
var editMode = GetPageParameterBoolean("editMode", false);
6. Configure Alarm columns and filter scope
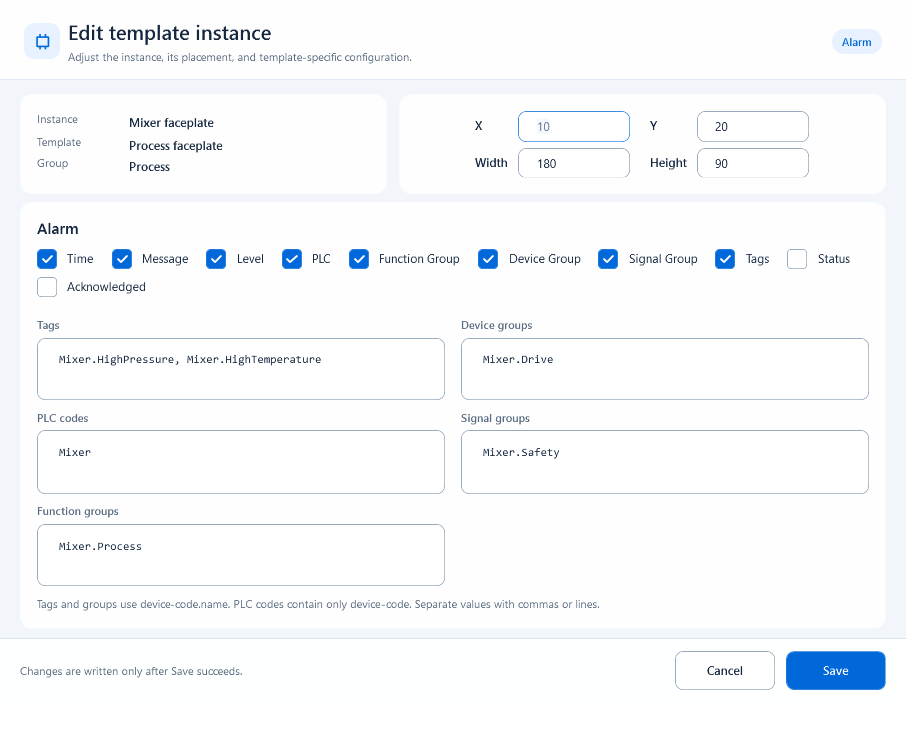
An Alarm template controls both the visible columns and the alarm scope. Select only the required columns from Time, Message, Level, PLC, Function Group, Device Group, Signal Group, Tags, Status, and Acknowledged. Then enter project codes in the relevant filters. Separate several values with commas or lines and use codes rather than display names.
- Tags: full device-code.tag-code, for example <PLC>.<ALARM_TAG>.
- PLC codes: device-code only, for example <PLC>.
- Function groups: device-code.group-code.
- Device groups: device-code.group-code.
- Signal groups: device-code.group-code.
- An empty filter dimension adds no extra restriction; test with a known active alarm after export.
7. Test active alarms in template scripts
Use the alarm helpers when an icon, color, or label must react to the current alarm state. Each returns true or false for active alarms matching the supplied scope. Pass an array or comma/newline-separated text. These helpers test current alarm state; they do not query history or acknowledge alarms.
- GetAlarmTags(values): match full tag codes.
- GetAlarmPlcCodes(values): match PLC or device codes.
- GetAlarmFunctionGroupCodes(values): match function-group codes.
- GetAlarmDeviceGroupCodes(values): match device-group codes.
- GetAlarmSignalGroupCodes(values): match signal-group codes.
var hasTagAlarm = GetAlarmTags([
  "<PLC>.<ALARM_TAG>"
]);

var hasDeviceAlarm = GetAlarmDeviceGroupCodes([
  "<PLC>.<DEVICE_GROUP>"
]);

return hasTagAlarm || hasDeviceAlarm;
8. Pre-export validation and troubleshooting
Insert at least two instances with different values and verify that their text, tags, alarm scope, and interactions remain independent. Check where Input values are stored and verify page-parameter field names and destination defaults. If export reports an unresolved variable, fill the instance or correct the source template instead of hiding the issue with fixed text.
- Unresolved <variable>: check for an empty instance field or an unsupported placement.
- Missing Captured variable: check whether a dot, hyphen, space, or bit index was put inside the name.
- Placeholder unchanged in a script: keep it inside a JavaScript string literal.
- Value lost after navigation: it may need a page parameter instead of a Runtime Variable.
- Wrong alarm scope: distinguish full tags, PLC codes, and the three group-code fields.
- After updating a template, validate a newly inserted instance.