Scale is a behavior under the Geometry category, alongside Move and Rotate, all of which change the component's own geometry. Scale specifically handles size: it takes a numeric input (such as a tag value) and grows or shrinks the component proportionally. It fits bars that rise and fall with data, fill blocks that grow with a level, and icons that change size with a value. Bind it like any other behavior: select the target component in the left tree of the Behavior Browser, then drag Scale from the Geometry catalog onto that component node. Double-clicking the catalog item does not bind it; it only prompts you to drag.
Geometry
Geometry: Scale
Scale is one of the Geometry behaviors. It maps a numeric input into a size change on the component, typically for bar growth, level fill, or icons that grow and shrink with a value. Bind it by dragging it onto a component in the Behavior Browser.
What it is and what it is for
Scale is a behavior under the Geometry category, alongside Move and Rotate, all of which change the component's own geometry. Scale specifically handles size: it takes a numeric input (such as a tag value) and grows or shrinks the component proportionally. It fits bars that rise and fall with data, fill blocks that grow with a level, and icons that change size with a value. Bind it like any other behavior: select the target component in the left tree of the Behavior Browser, then drag Scale from the Geometry catalog onto that component node. Double-clicking the catalog item does not bind it; it only prompts you to drag.
How to use it: every control in the editor
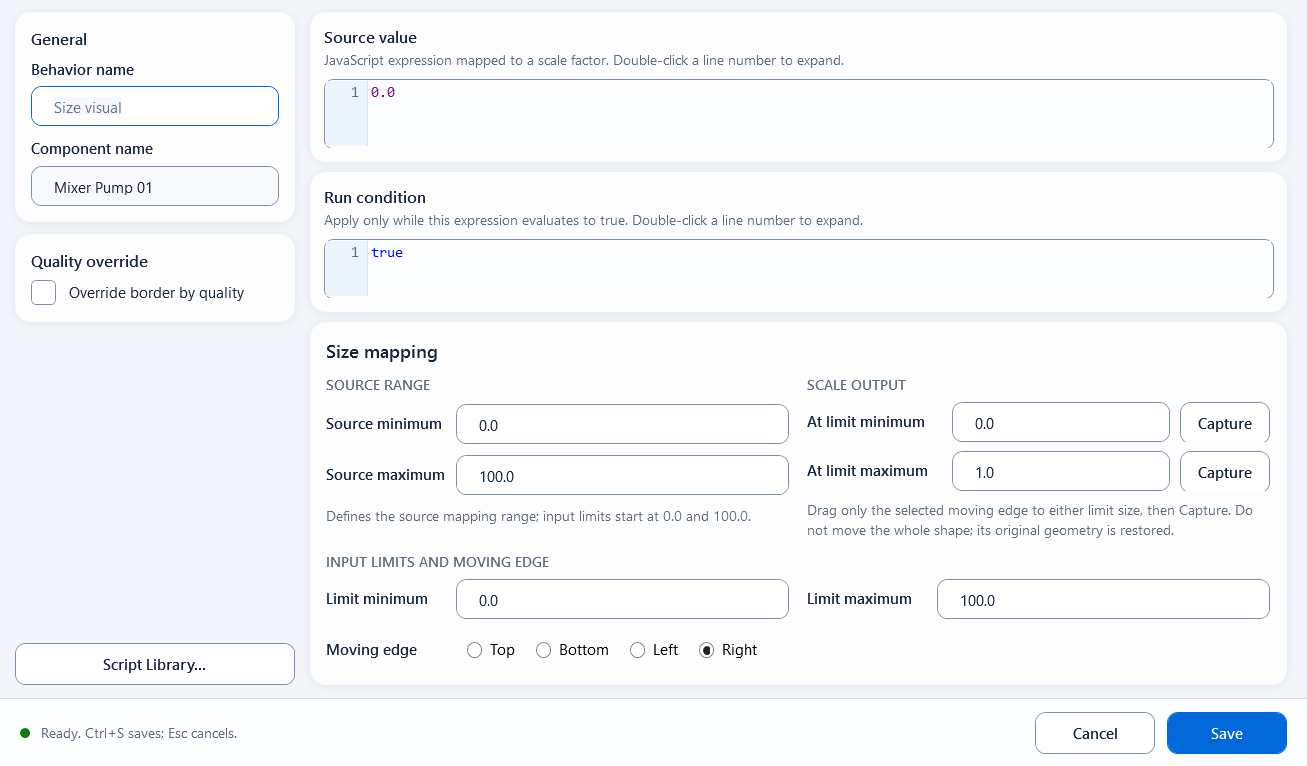
Double-click the Scale behavior under the component to open the editor. It first converts Source Value into a percentage inside Source Min / Source Max, then maps that percentage to a scale factor between Scale Min and Scale Max. Scale Min / Scale Max are factors, not percentages.
General / Behavior Name: the display name used in the behavior tree.
General / Component Name: the current component name, read-only. If it is wrong, close the editor and select the right component.
Quality Override / Quality Border: enables the GOOD / BAD color swatches. GOOD defaults to #000000, BAD defaults to #FF8800.
Script functions button: opens the snippet picker and inserts into the focused expression box; with no focused field it defaults to Source Value.
Source Value: the expression that drives scaling, default 0.0; usually ReadTagDouble(...) reads the tag.
Condition: the run condition expression, default true; false skips this Scale update.
Source Min / Source Max: the input source range, default 0.0 / 100.0; together they define the input's percentage position.
Scale Min / Scale Max: endpoint scale factors, default 0.0 / 1.0. 1.0 is original size, 0.5 is half, 1.5 is 1.5x. The Target buttons beside them can write a factor from the current PowerPoint shape size.
Limit Min / Limit Max: input clamp range, default ValueMin / ValueMax; use it to bound the input used for mapping.
Moving Edge: the edge that moves, one of Top / Bottom / Left / Right. Top means the top edge moves and the bottom stays fixed; Right means the right edge moves and the left stays fixed.
Bottom status / OK / Cancel: the status area shows live validation; OK saves only after validation passes, while Cancel or closing discards changes.
// Source Value
ReadTagDouble("Tank01.Level", 0)

// Source Min=0  Source Max=100
// Scale Min=0.0 Scale Max=1.0
// Moving Edge=Top (top edge moves, bottom fixed, like a rising level)
How the Target buttons work
Scale Min / Scale Max also have Target buttons. When the editor opens, it snapshots the component's original size. After you resize that same component in PowerPoint and click Target, the editor calculates target size / original size using the selected Moving Edge, writes the factor into the field, then tries to restore the component to its original geometry.
Choose Moving Edge first, because it decides whether the calculation uses width or height and which edge defines the target size.
Top / Bottom use height: Top uses original bottom minus current top, and Bottom uses current bottom minus original top.
Left / Right use width: Left uses original right minus current left, and Right uses current right minus original left.
If the original width/height is zero, the target size would be negative, or the selected object is not the same component, Target warns and refuses to write.
Target writes a 0.### factor. If you need a fixed expression instead, you can still overwrite Scale Min / Scale Max by hand.
When to use it
Use Scale when a value should show up directly as the component getting bigger or smaller. Typical scenarios:
Level fill: a fill block inside a tank rises with the level percentage; set Moving Edge to Top so the bottom stays fixed.
Bar growth: a throughput or load bar grows from one end with the value; set Moving Edge to the edge it grows toward.
Icon response: an icon scales between Scale Min and Scale Max with a value as a strength indicator.
Boundaries and common mistakes
The most common traps with Scale:
Moving Edge is the edge that moves, not the fixed one: choosing Top means the top edge moves and the bottom is fixed; Left means the left moves and the right is fixed. To keep an edge still, pick its opposite.
Scale Min / Scale Max are scale factors, not percentages: the original size is 1.0, not 100.
One Moving Edge means one direction: if you pick Right, do not expect it to scale toward both sides; the fixed edge does not move.
The current Scale editor has no Hide outside range checkbox. If you need out-of-range hiding, combine Condition with a visibility behavior.
To keep the mental model simple, set Source Min = Limit Min and Source Max = Limit Max to avoid adjusting the input range twice.
Figure 1: Scale editor
Map a value into a scale factor and use Moving Edge to choose which edge moves and which stays fixed.