Tags are the data foundation of HQControl. Screen values, alarm thresholds, trend curves, and third-party live APIs do not each connect to the PLC directly. They all depend on the same tag master data and latest value stream. For first setup, do not start with alarms, trends, or screen binding. Follow the real order: create the site, connect the device or PLC, create tags, then use Tag Diagnostics to prove the values are real.
Read a tag as a whole data path first
A tag is not just one row in a table. It is a path from the field to the screen: the site says where this HQControl host belongs, the device says which PLC or data source it connects to, the tag says which PLC address or symbolic path to read, how to parse it, and how often to collect it, and Tag Diagnostics proves whether that path has a live value right now. Later chapters should follow the same standard: explain the place in the workflow, then every visible control, then the verification step.
- Create the site: give this host a stable site identity.
- Connect the device: tell IO Worker which PLC to reach and which protocol to use.
- Create the tag: map a PLC address, symbolic path, or register into a unified system tag.
- Run Tag Diagnostics: confirm live value, quality, and timestamp before using the tag downstream.
Step 1: create the site and fix this host's identity
Open Sites and confirm the default site, local node, and access name. Single-machine projects usually only need the default site enabled and aligned with System Status. Federation, redundancy, or multi-site projects then add remote sites, standby nodes, and access names. The site code later appears in federation topology, current collection ownership, and device ownership, so do not rename it casually just because the display name changed.
- Site Code: stable identity used by federation, redundancy, and device collection ownership.
- Site Name: human-readable name for operators and maintainers.
- Local Node: the node where this HQControl host runs, also shown in System Status.
- Access Name: hostname, domain, or fixed address used by browsers or other sites.
- After site changes, return to System Status and confirm local site, nodes, and topology.
Step 2: connect the device or PLC before adding many tags
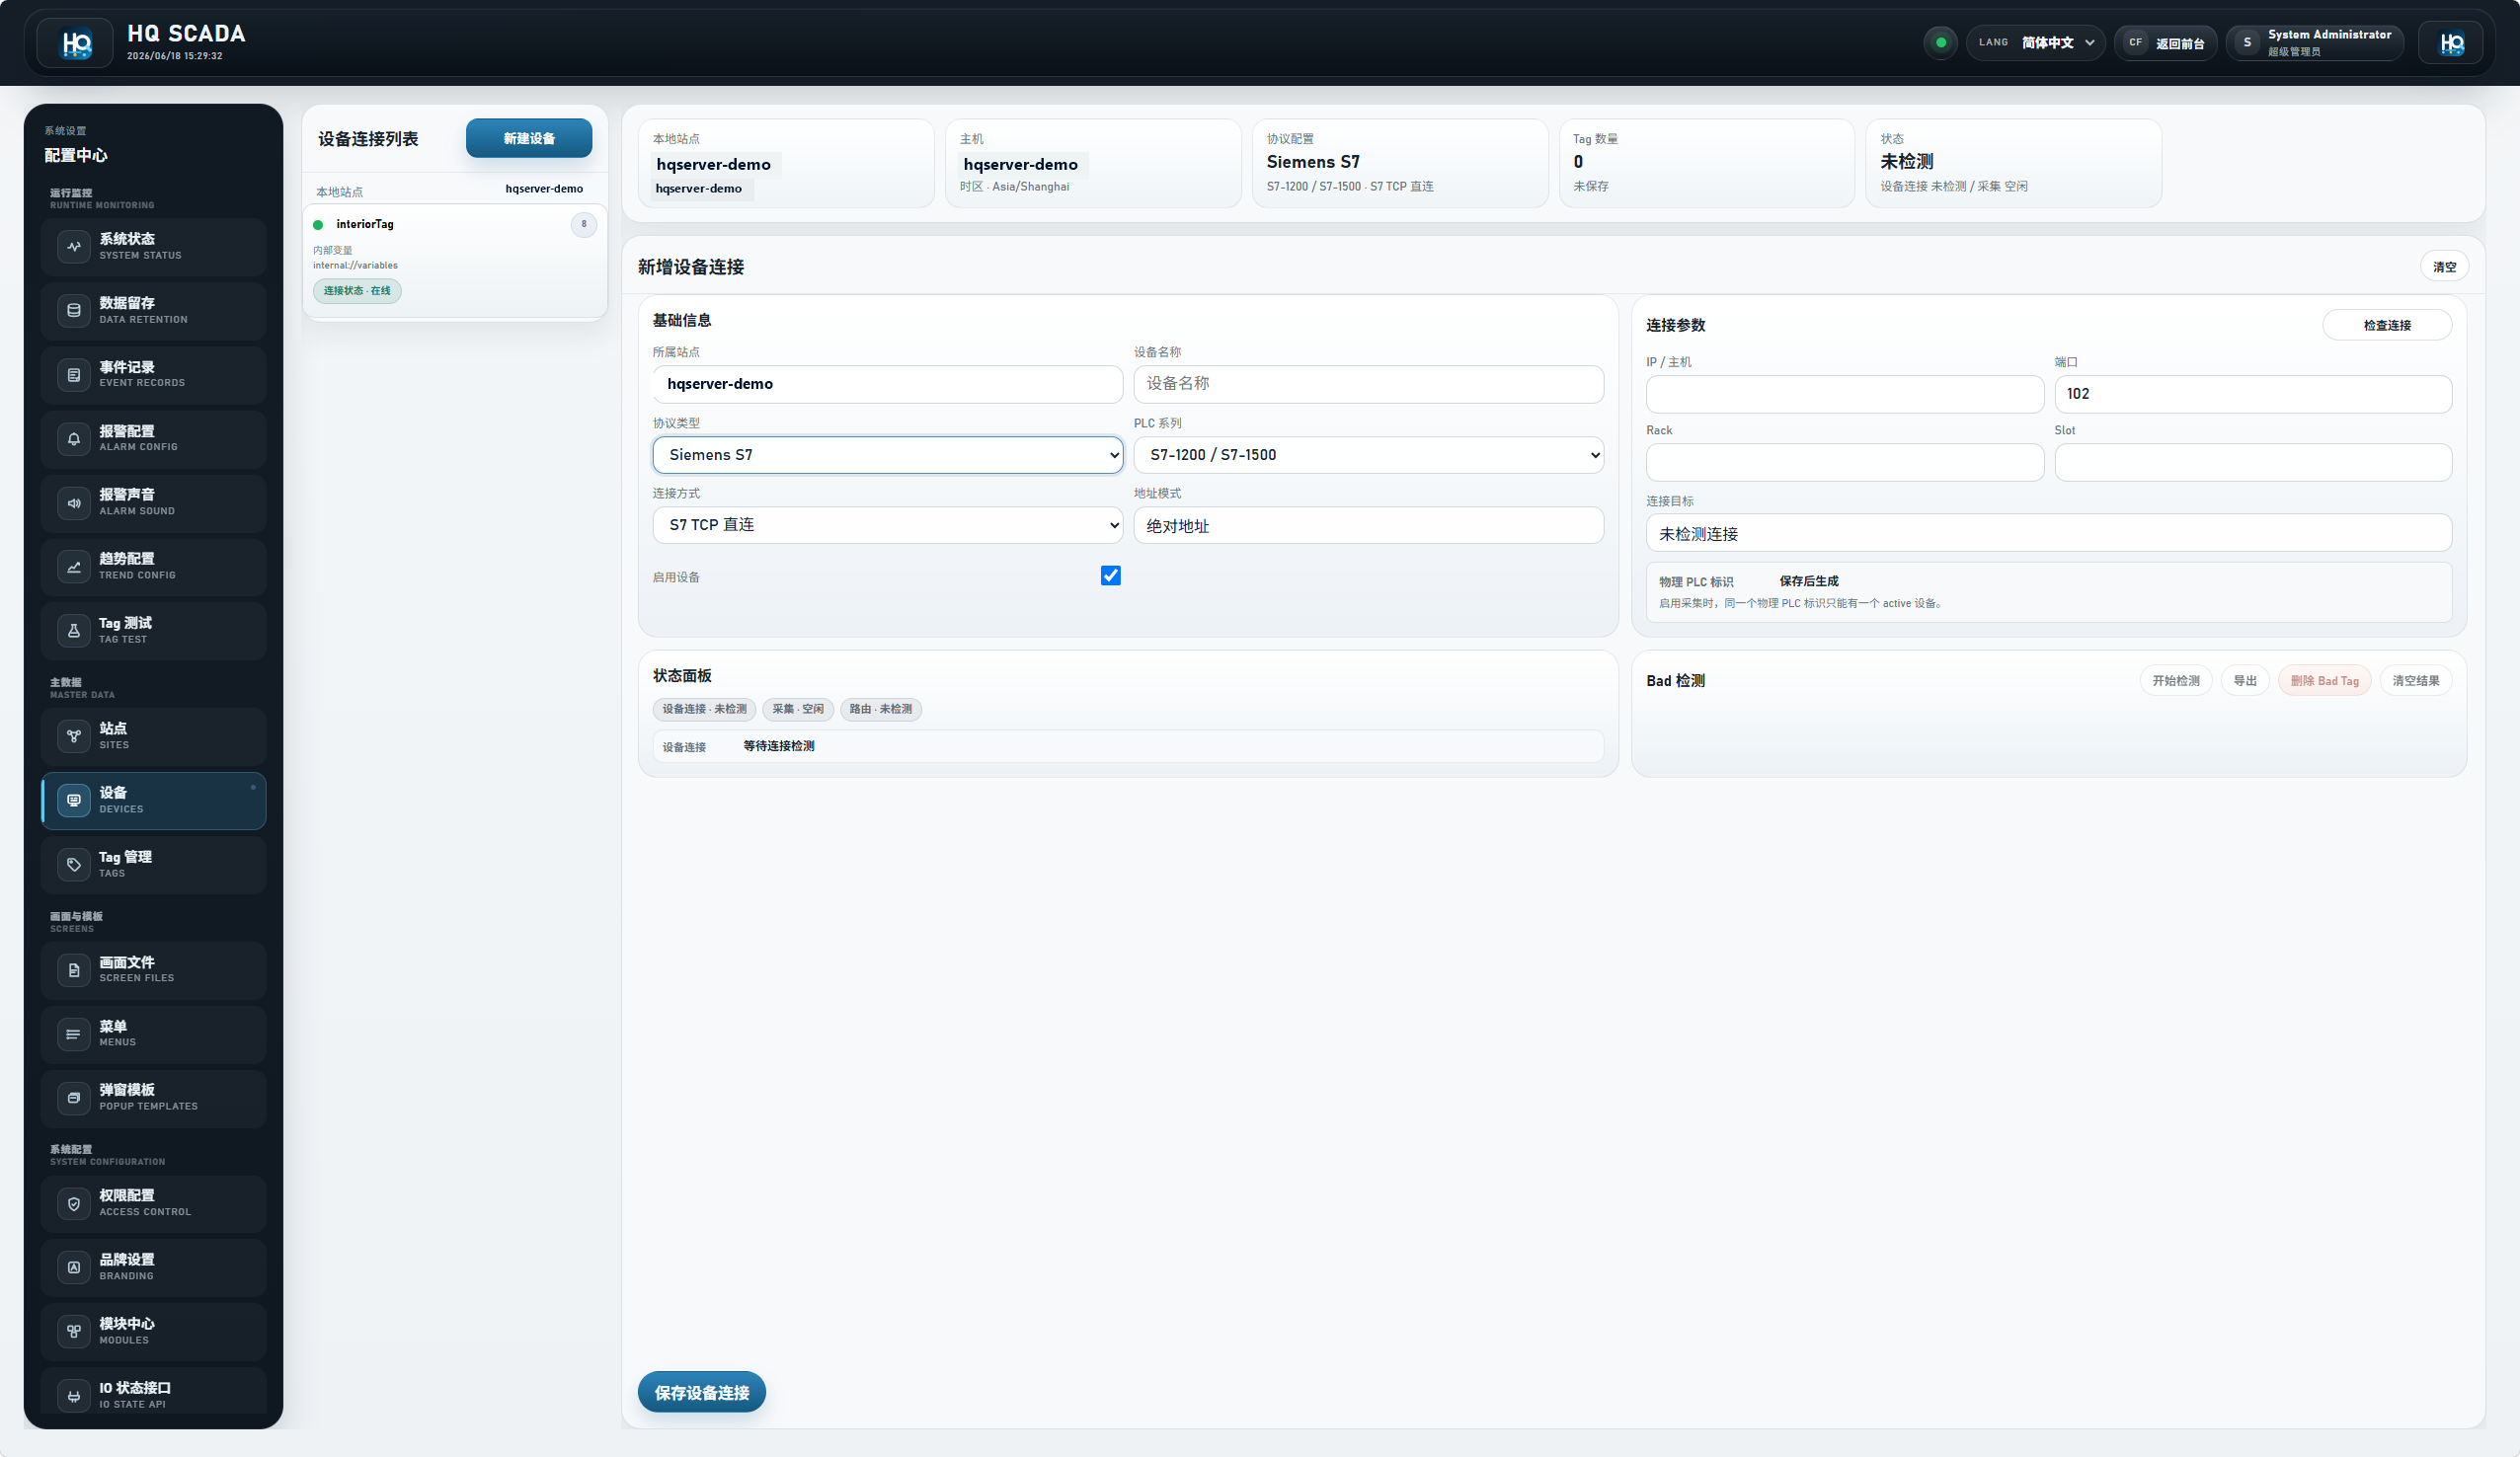
Open Devices and create a device connection. This page decides which PLC or data source HQControl reaches: device code, display name, protocol type, address mode, host, port, rack, slot, unit ID, polling switch, default scan period, connect timeout, request timeout, reconnect interval, max concurrent requests, batch read, and enabled state. After saving, do not rush to create a large tag list. Confirm the device can connect and the IO module has no obvious alarm first.
- Device Code: referenced by tag imports and full tag names. Keep it stable after commissioning.
- Protocol Type: choose the real path, such as Siemens S7, OPC UA, Modbus TCP, or internal variable.
- Address Mode: S7 absolute uses DB/Byte/Bit addressing; S7 symbolic uses an OPC UA symbolic path.
- Host / Port: use the protocol's real endpoint. Common ports are S7 TCP 102, OPC UA 4840, and Modbus TCP 502.
- Rack / Slot: used for S7 absolute addressing only; do not use it to validate symbolic addressing.
- Unit ID: Modbus TCP slave or unit ID, taken from the device manual.
- Scan period and timeouts: start with stable defaults. Tune the slow device itself before inflating site-wide behavior.
Split the connection paths: S7 absolute, S7 symbolic, and Modbus are different setups
A successful device connection and a correct tag read are not the same thing. A connection check only proves the network, handshake, or session is broadly available. It does not prove every DB address, symbolic path, register, or data type is correct. Separate the common paths before you fill tags.
- S7 absolute addressing: device uses S7 TCP, usually port 102. The tag fills S7 Area, DB No., Offset, and TIA Data Type.
- S7 symbolic addressing: device address mode is symbolic, the connection target is an OPC UA endpoint such as
opc.tcp://192.168.1.222:4840, and the tag fills symbolicAddress.
- OPC UA symbolic path: enable the PLC or gateway OPC UA Server and confirm endpoint, security policy, certificate, account, and variable access.
- Modbus TCP: confirm Unit ID, register type, register number, address base, byte order, and data type.
- Arrays, UDTs, and complex structures should be split into explicit scalar tags before entering HQControl.
- After a connection check passes, still use Tag Diagnostics to confirm the specific tag value, quality, and timestamp.
Step 3: open Tags and understand the top controls first
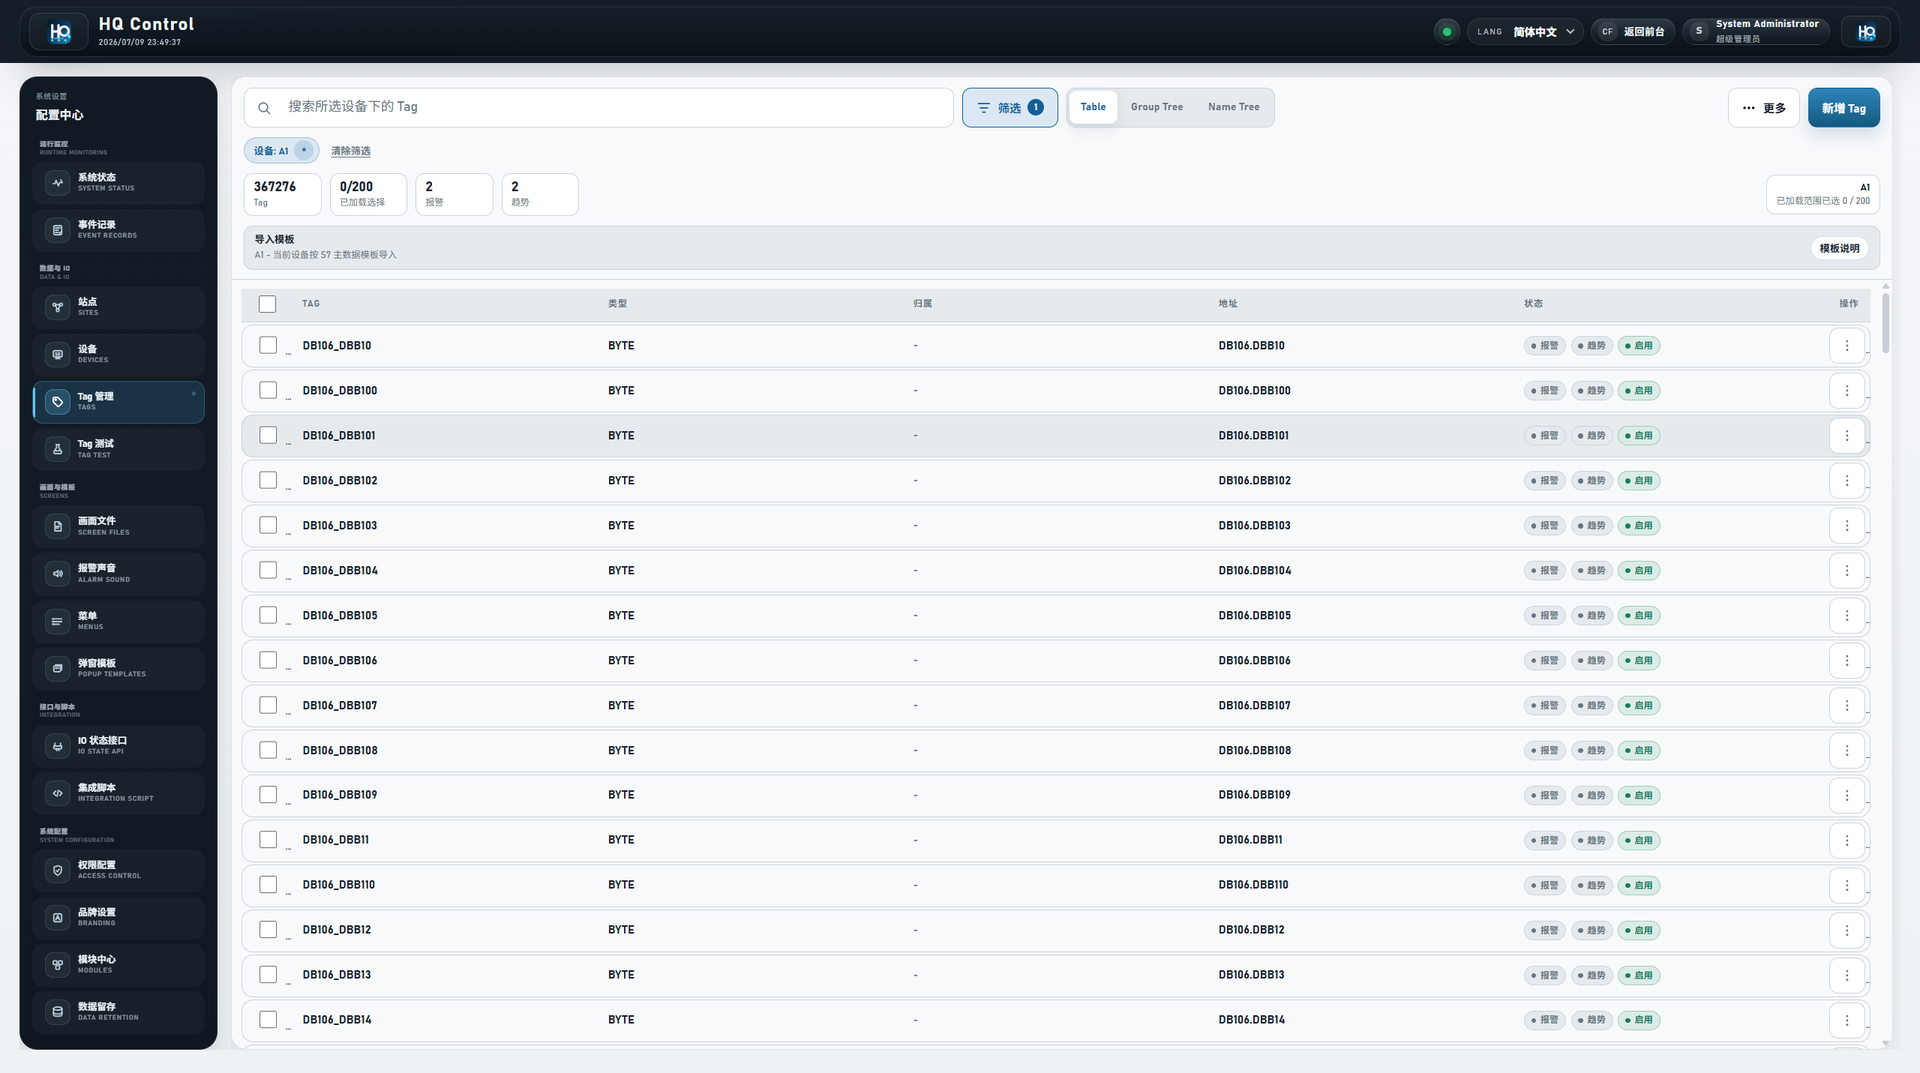
After opening Tags, do not immediately click New Tag. The top controls decide which tags you are looking at. Device, Function Group, Equipment Group, Signal Group, and Search narrow the current result together. Table is the flat review view. Group Tree expands by Function Group, Equipment Group, and Signal Group. Name Tree expands by dot-separated tag name. Tree views load on demand and fetch children when branches expand, which is expected in large projects.
- Device filter: shows tags under one device and sets the context for template download and import.
- Function Group / Equipment Group / Signal Group: filter only tags that actually carry these owner fields.
- Search: supports tag fragments plus
? and * wildcard patterns.
- Table / Group Tree / Name Tree: use them for flat review, owner-based browsing, and name hierarchy browsing.
- Refresh: reloads devices, tags, and metrics. Use it after import or batch edit.
- Load More: loads more tags when the list is not complete. Select Loaded applies only to loaded rows.
New or edit tag: fill the Owner group before the address
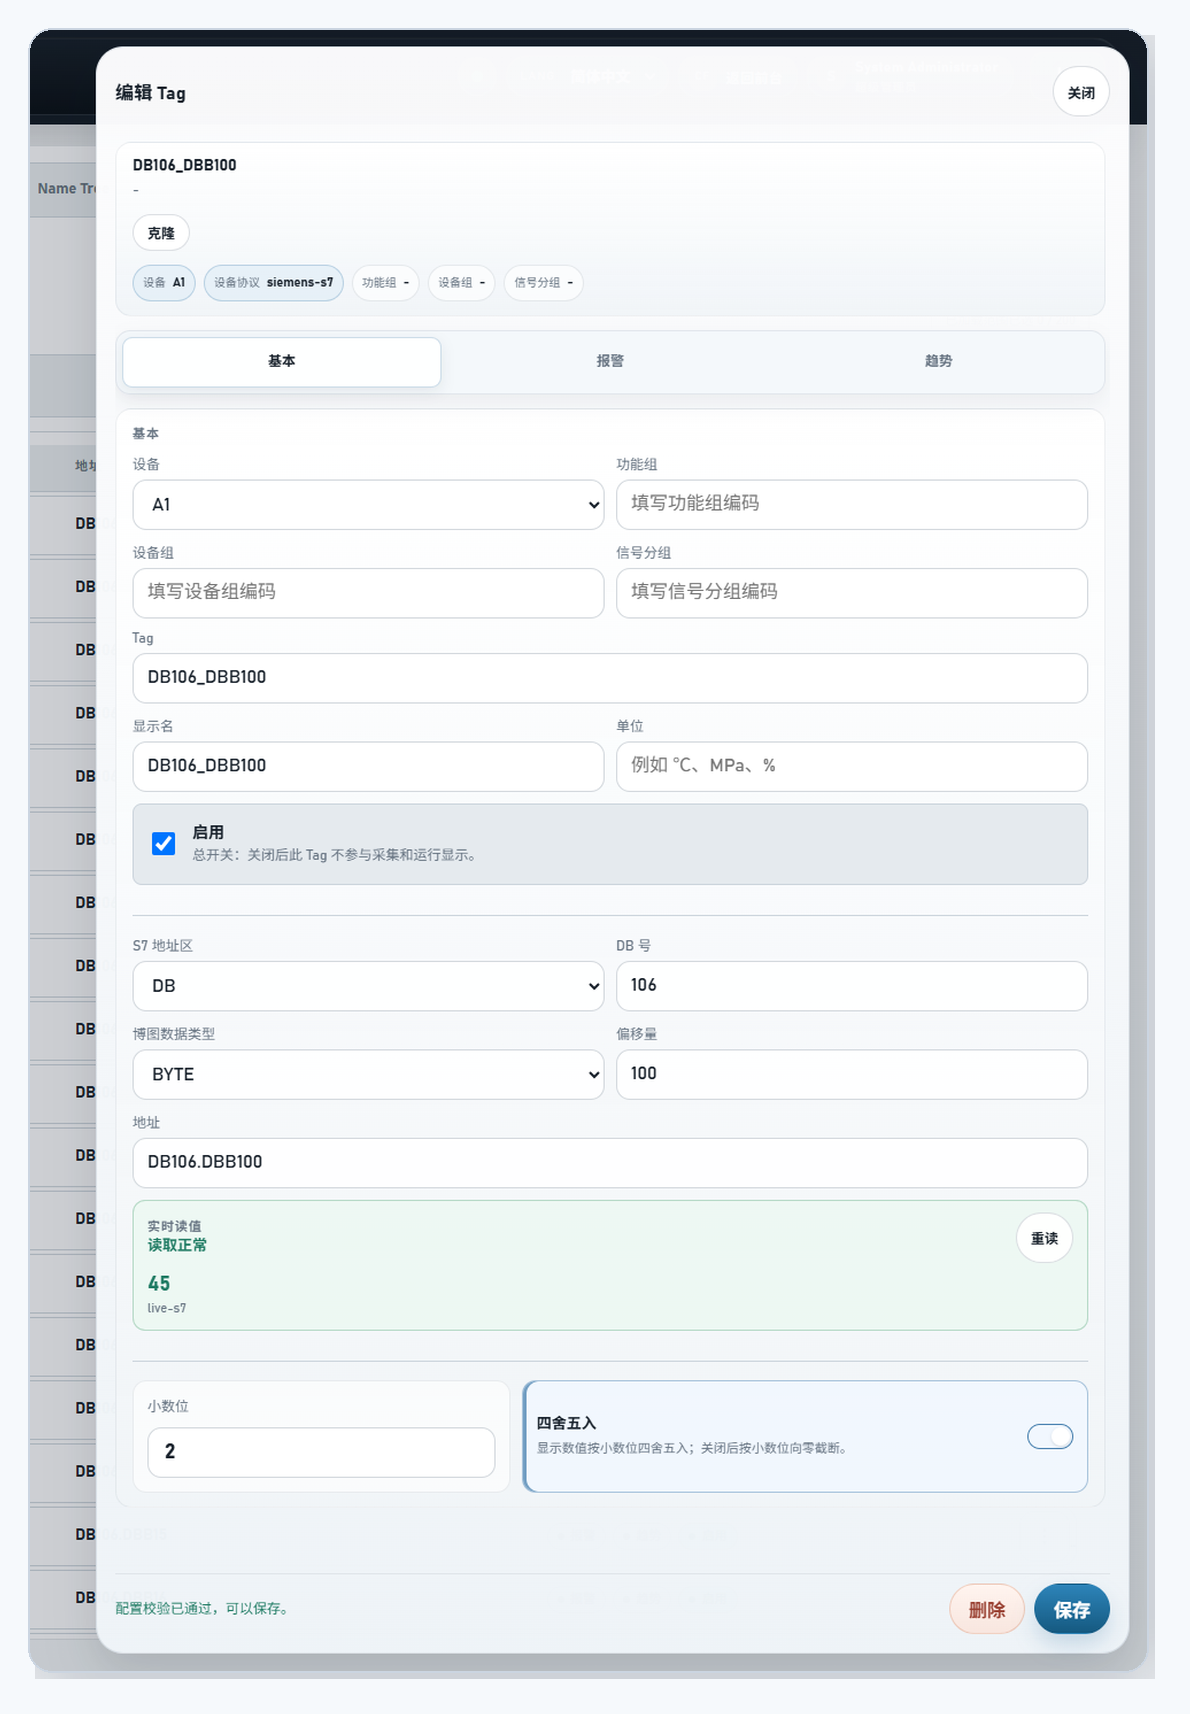
New Tag opens a drawer. The first group is Owner: Device, Device Protocol, Function Group, Equipment Group, Signal Group, and Tag. Device is required. Device Protocol is a read-only reminder from the selected device, and it decides which address controls appear later. Tag names allow letters, numbers, -, _, and dot segments. They must not contain [ or ] because brackets are reserved for bit-read expressions.
- Device: choose which PLC or data source owns this tag.
- Device Protocol: read-only hint for which address fields will appear.
- Function Group: line, area, process section, or system; enter the project-defined
<function-group-code>.
- Equipment Group: object or equipment unit; enter the project-defined
<equipment-group-code>.
- Signal Group: signal purpose; enter the project-defined
<signal-group-code>.
- Tag: the local tag name under the selected device, referenced by imports, screens, alarms, trends, and APIs.
- Owner fields are not a forced tree. Leave a field empty when the project has no such layer.
Address & Acquisition: fill only the fields for the selected protocol
The second drawer group is Address & Acquisition. Its fields change by device protocol and address mode. Internal variables show Variable Type, Retain, Set Initial Value, and Initial Value. S7 symbolic tags show Symbolic Address and TIA Data Type. S7 absolute tags show S7 Area, DB No., TIA Data Type, and Offset. Modbus shows Register Type, Register Number, and Modbus Data Type. OPC UA shows OPC Channel, OPC Device, and OPC Address. The final Address field is a read-only preview of how HQControl resolves the address.
- Internal variable: for system-side state or script-written values, not direct PLC reads.
- Retain: keeps the last written value after restart.
- Set Initial Value: used only when no runtime write value exists.
- Symbolic Address: PLC symbolic item path. Do not also fill DB number and offset.
- S7 Area / DB No. / Offset: absolute addressing fields. Offset can express byte or bit position.
- Register Type / Register Number: Modbus fields that must match the device manual's address base.
- Address preview: review it before saving. If it looks wrong, fix the device or address fields first.
Status: decide which runtime capabilities this tag joins
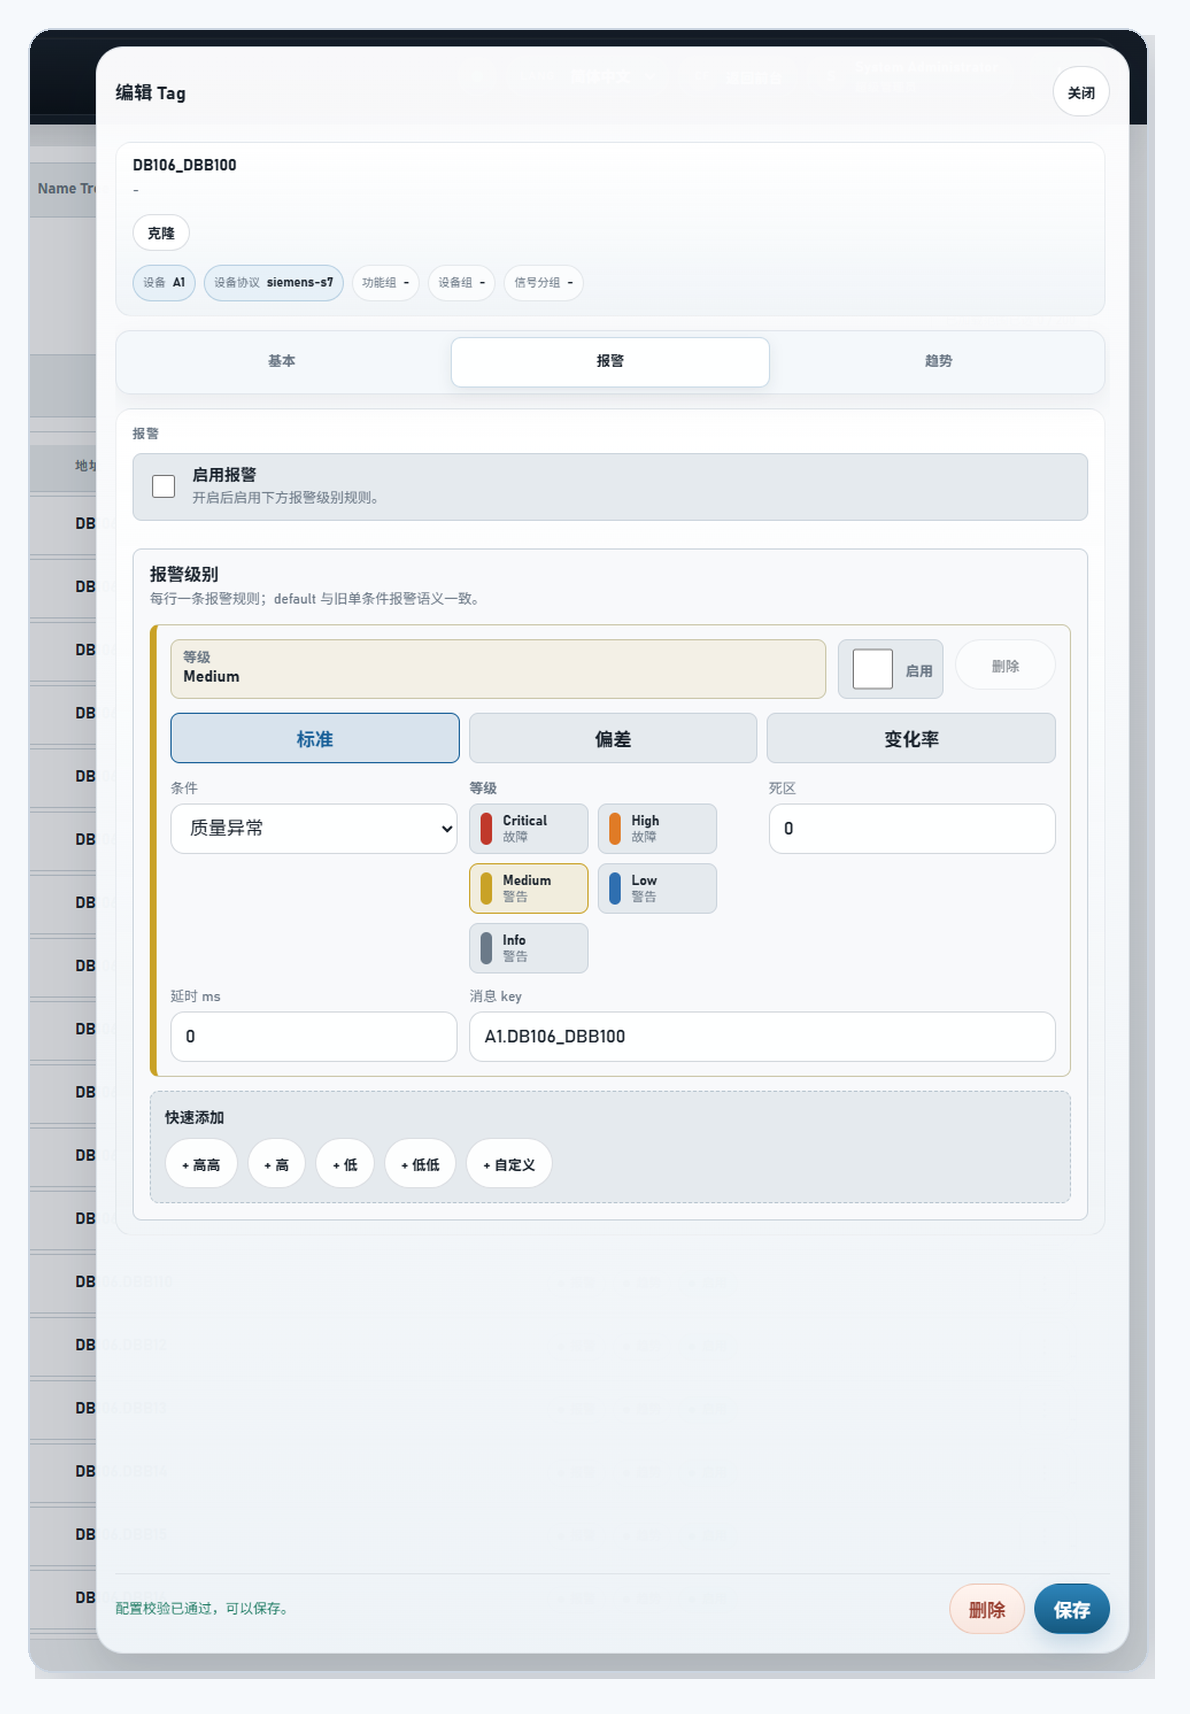
The tag editor drawer is now split into Basic, Alarm, and Trend tabs. Basic maintains ownership, address, live value, and display fields; Alarm maintains level rules; Trend maintains archiving behavior. Enabled is the master switch. When it is off, the tag is not collected or shown at runtime. Do not batch-enable alarms and trends before the tag has stable live values, or address mistakes, type mistakes, and real process events will be mixed together.
- Basic: confirm device, function group, device group, signal group, tag name, address, live value, decimals, and enabled state.
- Alarm: enable alarms, then configure standard, deviation, or rate-of-change rules with level, deadband, delay, and message key.
- Trend: enable trends, then choose change recording or timed collection, deadband or interval, and trend policy.
- Delete: shown only when editing an existing tag. Do not delete tags already referenced by screens, alarms, trends, or APIs.
Import, templates, and Target ID: make batch work traceable
For many tags, prefer template import. Select the device first, open Template Guide, then download Template JSON or Template Excel. In the import file, deviceCode must exactly match the local device code, including case. code is the tag name under that device. It is not generated from display name, symbolic address, or raw address. Import runs a precheck first. The targetId in precheck and results identifies the import row, so you can see which row will be created, updated, skipped, or rejected.
- Import: reads JSON or Excel and runs precheck first. It is not a blind write.
- Template Guide: explains required columns, sample row, and protocol-specific rules.
- Template JSON / Template Excel: downloads a template for the current device and address mode.
- Import confirmation: submits batches only after precheck is accepted.
- Cancel: use it when device code, address, or type is wrong, then fix the file and retry.
targetId: row target identifier used by import precheck and result dialogs. Duplicate targetId values are reported as duplicate targets.- Files exported from another server can be imported only after the matching local device code exists.
Batch edit, export, and tree views: narrow the scope before changing many tags
The selection and batch buttons operate on loaded results. Select Loaded selects only the currently loaded rows, not every tag in the database. Clear Loaded and Clear Selection remove current selections. Batch Edit updates only the fields you explicitly check, including Function Group, Equipment Group, Signal Group, alarm flag, trend flag, and enabled state. Export All JSON and Export All Excel export tags using the current import/export fields for handover records or offline review.
- Filter by device and groups before selecting loaded rows.
- Each Batch Edit field has its own checkbox. Unchecked fields stay unchanged.
- Batch update has a maximum size; narrow the filter when the limit is reached.
- JSON export is useful for system migration or version comparison.
- Excel export is useful for field review, customer signoff, and bulk edits.
- Expand and Collapse only change the tree view state. They do not change tag data.
Step 4: use Tag Diagnostics to prove the value is really there
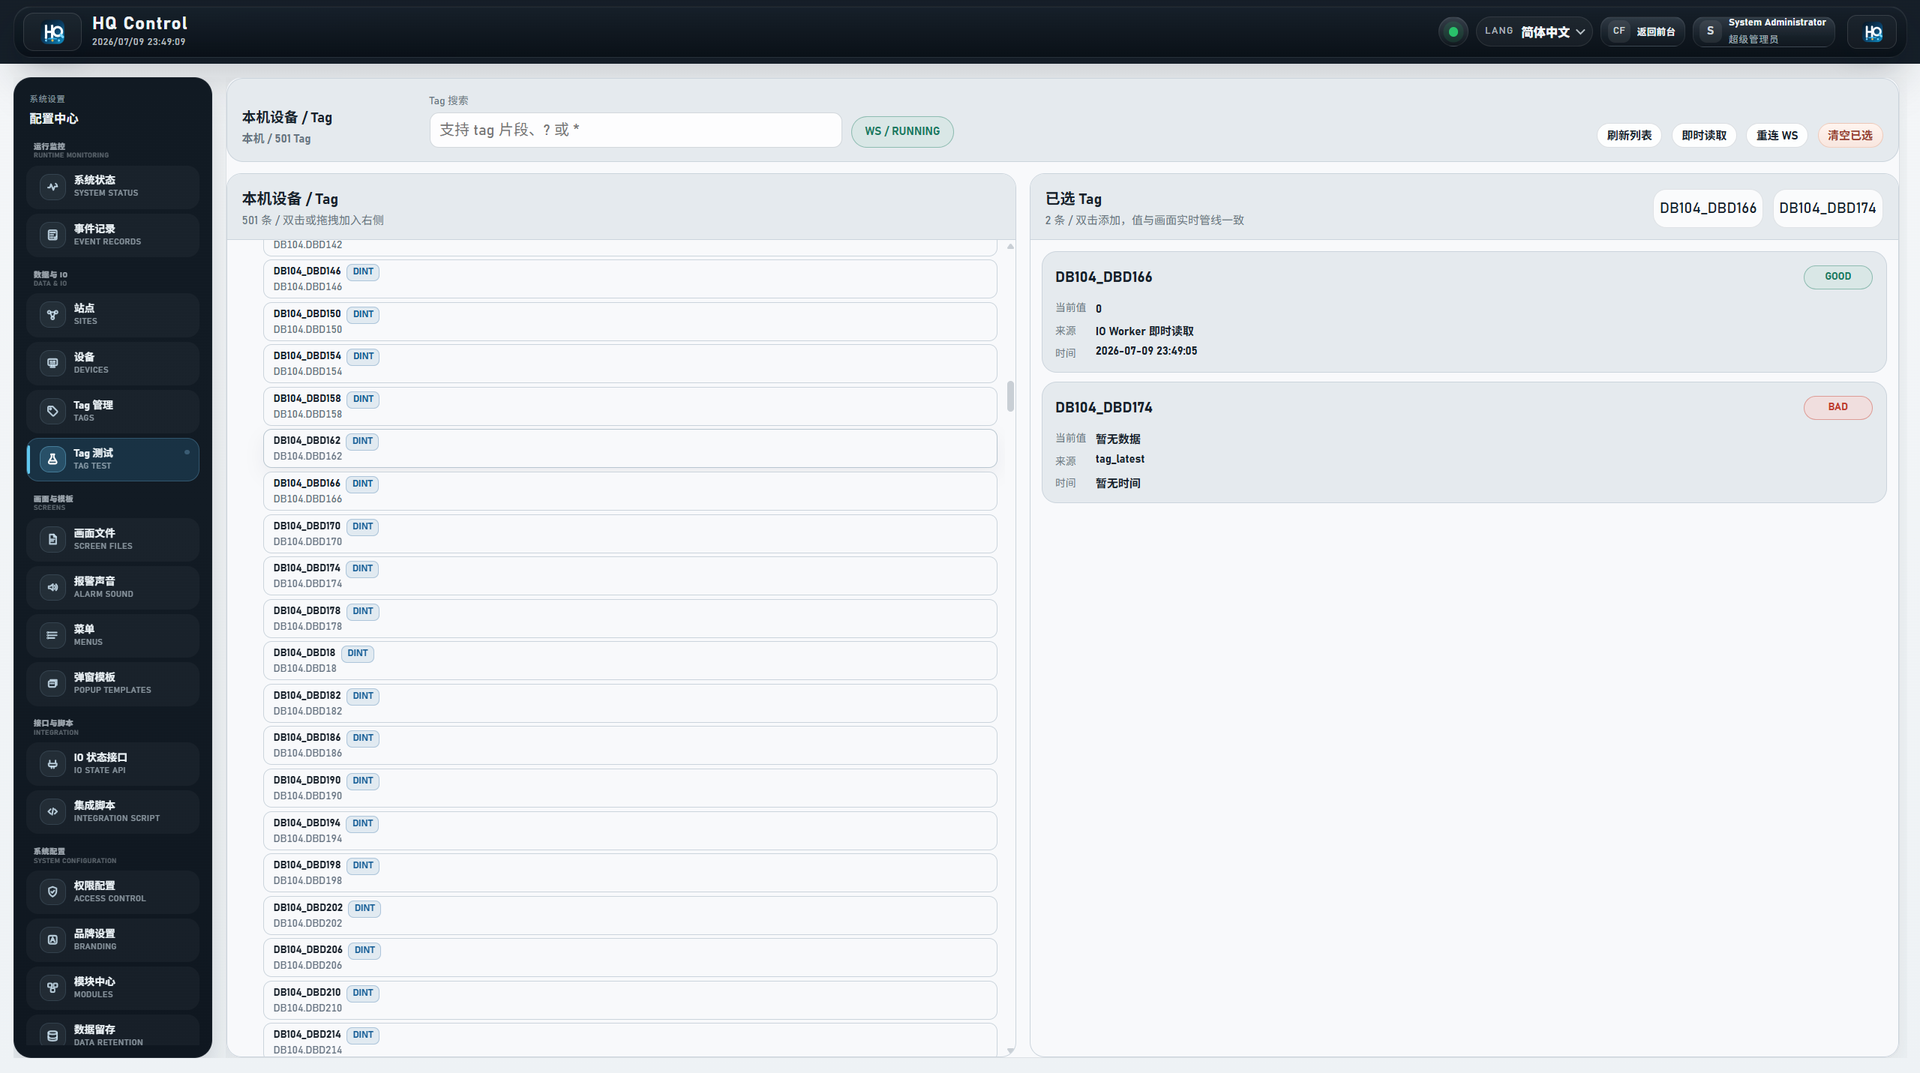
After creating tags, open Tag Diagnostics. The left side is a browsable tag library. Search supports tag fragments, ?, and *. Expand the server, then the device, then double-click or drag tags into the right side. The right side shows Selected Tags, and each value card shows quality, displayed value, source, and timestamp.
- Refresh List: reloads the device and tag catalog.
- Read Now: asks IO Worker to read selected tags immediately. GOOD/BAD follows this read.
- Reconnect: reconnects the WebSocket subscription for page update diagnosis.
- Clear Selected: clears selected tags and current values.
- GOOD quality: the value is trustworthy enough to configure screens, alarms, and trends.
- bad_address: wrong address, missing DB/register/symbolic path, or out-of-range address.
- bad_type: the address can be read, but the configured data type does not match the device.
- stale / timeout / no_data: check device online state, current collection owner, scan period, and network delay.
Chapter standard: use this depth for the rest of the manual
Later chapters should match this depth. Start by explaining where the feature sits in the workflow, then walk through the real entry point, visible controls, fields, buttons, and post-save verification. Screenshots are not decorative. The title should name the UI object, and the caption should tell the reader what decision to make from the image. Small controls such as targetId, Load More, and Read Now also need coverage: where they appear, what they change, and what they do not change.
- Writing order: scenario, entry point, controls, verification, common mistakes.
- Field coverage: explain only fields visible in the current UI; do not present backend fields as user controls.
- Button coverage: state what happens after click, whether data is written immediately, and whether confirmation is needed.
- Screenshot standard: current high-resolution UI screenshot, descriptive alt text, decision-oriented caption.
- Acceptance standard: the reader can go from an empty site to one GOOD-quality tag.